RRZE – Projekte & Prozesse (P&P)

Das Blog der RRZE Stabsstelle "Projekte & Prozesse"

Content

Happy Birthday RRZE-Icon-Set

English Version

400

Was einst mit einer Idee, oder der vergeblichen Google-Suche nach dem passenden Icon, begann hat nun eine erstaunliche Marke erreicht: das offizielle RRZE-Icon-Set hat sein 400. Icon!

Aufgrund dieser großen Zahl an verschiedenen Icons und ihrer unterschiedlichen Verwendung wurde die Anzahl der Unterordner um zwei weitere erweitert. Mittlerweile sind die Icons also aufgeteilt in:

  • actions (Technische Aktionen, wie etwa: Sortieren, Zusammenfügen, das Verschicken von E-Mails, etc.)
  •  categories (Verschiedene Zugehörigkeiten wie: Arbeitnehmer, Admin, Benutzer, etc.)
  •  devices (Im allgemeinen IT-Hardware wie: Server, Datenbank, etc.)
  •  NEU: documents (Dokumente aller Art)
  •  emblems (Der größte Ordner umfasst alle Icons die ein Label oder ein konkretes Bild für einen abstrakten Begriff oder eine Funktion darstellen.)
  •  NEU: logos (Hier befinden sich alle Icons die in irgendeiner Weise ein Logo beinhalten.)
  •  mime-types (Hier lassen sich Icons für verschiedene Medientypen finden: Text, Video, Audio, etc.)
  •  status (Alle Icons, die einen Status darstellen: wartend, geprüft, gelöscht, etc.)

Das hauseigene Icon-Set stellt “kleine bunte Bildchen” zu verschiedenen IT-Themen, Aktionen, Funktionen und vielem mehr zur Verfügung.

Um einen einheitlichen Stil zu erhalten werden bei der Erstellung die Vorgaben des Tango-Icon-Themes eingehalten.

Verfügbar sind die Icons im Svg- (jeweils eine detailreiche und eine detailärmere Variante für die kleineren Skalierungen) und im Png-Format in den Größen 16×16, 22×22, 32×32, 48×48, 150×150 und 720×720 Pixel und können direkt auf der Seite heruntergeladen werden.

Falls allerdings das passende Icon immer noch fehlen sollte lässt sich dieses jederzeit noch der Sammlung hinzufügen. Hierfür einfach eine E-Mail an franziska.sponsel@fau.de schicken.

Wichtig bei der “Icon-Bestellung” ist allerdings, dass folgende Grundinformationen in der Mail stehen:

1. Welche Funktion etc. soll das Icon haben bzw. darstellen? Am besten auch für IT-Laien verständlich 😉

2. Gibt es schon konkrete Vorstellungen zum Aussehen (z.Bsp. ein Häuschen für “home”) oder Farbwünsche?

Es sollte auch immer darauf geachtet werden, dass durch die kleine Skalierung ein Icon  aus nicht mehr als maximal 3 Bestandteilen bestehen kann.

Mittlerweile hat das RRZE-Icon-Set die Versionsnummer 2.3 erreicht und hat in einer Vielzahl von Projekten Anklang und Verwendung gefunden. Sowohl hier in Erlangen in RRZE eigenen Projekten, aber auch in anderen Arbeiten und Projekten in Deutschland, Indien bis hin zum sonnigen California, USA.

English Version

400

What once started off with an idea, or a fruitless Google search for the perfect Icon, has now reached an incredible benchmark: the official RRZE Icon Set got its 400. icon!


Because of this huge number of various icons and their different usage, the number of sub-folders has been expanded by two additional folders. Therefore the icons are now divided into:

  • actions (technical actions, e.g.: sort, merge, send e-mails, etc.)
  • categories (different entitlement or categories, e.g.: employee, admin, user, etc.)
  • devices (generally IT-hardware, e.g.: server, databases, etc.)
  • NEW: documents (documents of all kind)
  • emblems (the biggest folder concludes all icons which represent a label or a proper picture for an abstract term or function)
  • NEW: logos (here you can find icons which represent or conclude a logo)
  • mime-types (icons for different media types, e.g.: text, video, audio, etc.)
  • status (icons that represent a status, e.g.: awaiting, approved, deleted, etc.)

The RRZE own icon set offers “tiny colorful pictures” for various IT topics, actions, functions and many more.

To create a consistent style the icons are made according to the style sheet of the Tango Icon Theme.

The icons are available in svg- (a more and a less detailed version for smaller scaled icons) and in png-format in the sizes 16×16, 22×22, 32×32, 48×48, 150×150 and 720×720 pixels and can be downloaded directly from the   website .

If the perfect icon for a purpose is still missing it can easily be added to the set. Therefore don’t hesitate to send a request e-mail to  franziska.sponsel@fau.de.

Important for the “Icon-Order” is that the following basic information is given and in the e-mail:

1. What function etc. should the icon represent? The best way is to explain it that even an ordinary person can understand it 😉

2. Are there already ideas on how the icon should look like (e.g. a small house for “home”) or wishes for the icon’s color?

You should also keep in mind that, due to the small size of an icon, it can only consist of a maximum of 3 properties.

By now the RRZE Icon Set has reached the version number 2.3 and is used in various projects. Here in Erlangen, but also from whole Germany, India to the sunny state of California, USA.

Identity Management an der FAU – Hintergrund und aktueller Stand (Teil 3)

Hintergrund

Im November 2006 startete das Projekt zum Aufbau einer zentralen Identity Management-Infrastruktur mit der Zielsetzung, eine Grundlage für die effiziente Nutzung der universitären IT-Dienste bereitzustellen (siehe Projektleitdokument vom 20.12.2006). Die damals festgelegten strategischen Ziele haben bis heute Bestand:

  • Bewältigung der steigenden Verwaltungsanforderungen
  • Vermeidung duplizierter Datenbestände
  • Erhöhung der Benutzerfreundlichkeit
  • Entlastung der Sachbearbeiter und Administratoren
  • Erhöhung der Datenqualität und Validität
  • Erhöhung der Datensicherheit

Hinzu kam im Laufe des Projekts der Aspekt der Systemintegration, der durch ein IdMS nicht nur gefördert, sondern erst grundlegen ermöglicht wird.

Am 8. Oktober 2008 gingen erste Teile “hinter den Kulissen” in den produktiven Betrieb. Seitdem wurden auf dieser Basis eine Vielzahl von Erweiterungen entwickelt, welche das heutige IdMS letztendlich ausmachen. Das Grundkonzept blieb im Kern erhalten.

Alle folgenden Ausführungen beziehen sich auf den aktuellen Stand des Systems.

Quellsysteme

Als Quellsysteme werden Systeme bezeichnet, aus welchem das IdMS Daten liest. Die Quellsysteme des IdMS können grob in folgende Kategorien unterteilt werden:

  • Personenverwaltungssysteme
  • Strukturverwaltungssysteme
  • Sonstige Systeme

Aktuell sind folgende Personenverwaltungssysteme angebunden:

  • Stammdatensystem für Studierende HIS SOS
  • Personalverwaltungssystem VIVA
  • Indirekt über das IdM-nahe Personenverwaltungssystem für “Sonstige” (Yet Another AFFiliation, kurz yaaff) als Qualitätssicherungsschicht:
    • Informationssystem UnivIS
    • Promovierendenverwaltung docDaten
    • Personenverwaltungssystem FAU Busan
    • Sonstigenverwaltung RRZE

Der einzige Vertreter der Kategorie Strukturverwaltungssysteme ist die zentrale Anwendung zur Pflege der Organisationsstruktur FAU.ORG.

Vertreter der Kategorie “Sonstige Systeme” sind u.a. Systeme welche die Datenhoheit für mindestens ein Attribut besitzen. Zum Beispiel werden die offiziellen Mailadressen nicht im IdMS erzeugt bzw. festgelegt, sondern aus dem System zur Reservierung von Mailadressen abgefragt.

Kern

Der Kern des IdMS besteht aus einer Vielzahl von einzelnen Modulen. Während ein Teil der Module die korrekte Zusammenführung von Personeneinträgen aus unterschiedlichen Quellsystemen übernimmt, berechnet ein anderer Teil die ableitbaren Dienstleistungen. Allen gemein ist das zugrundeliegende Meta-Directory, also die IdMS gespeicherten Daten.

Änderungen in Quellsystemen sollen möglichst zeitnah aufbereitet und in alle betroffenen Systeme synchronisiert werden. Darunter fallen auch Aktionen der Anwender in den Web-Anwendungen; allen voran das Setzen eines neuen Passworts. Die Auswirkungen reichen von einfachen Wertänderungen in einem Attribut bis hin zur kompletten Neuanlage oder Löschung eines Kontos.

Zielsysteme

Als Zielsysteme werden Systeme bezeichnet, in welche das IdMS Daten schreibt. Aktuell sind folgende Zielsysteme angebunden:

Frontends

Als Frontends werden Systeme bezeichnet die beispielsweise im Rahmen einer Webanwendung Zugriff auf bestimmte Daten und Funktionen des IdMS bieten.

IdM-Portal

Das IdM-Portal gliedert sich derzeit in die Bereiche “Self Service” und “Anfragen/Aufgaben”.

Der Self Service ermöglicht den im IdMS verwalteten Person die Einsicht von gespeicherten persönlichen Daten zum Zwecke der Datenschutzselbstauskunft. Desweiteren kann der Benutzer den Status der verfügbaren Dienstleistungen einsehen und Aktionen zur Konto- und Diensteverwaltung durchführen.

Der Bereich Anfragen/Aufgaben ermöglicht es, u.a. auch langlaufende Prozesse mit mehreren Beteiligten Personen einfach zu verwalten.

Administration

Die Administrationsfunktion im IdMS bietet Mitarbeitern des RRZE und der FAU mit Aufgaben im IdM-Umfeld erweiterten Zugriff auf die zur Durchführung nötigen Daten.

Dazu gehören z.B. die Mitarbeiter der Service-Theken, die so Benutzern bei Problemen mit ihrem IdM-Zugang oder einzelnen Dienstleistungen auf Anfrage Hilfestellung geben können. Die häufigsten Fälle sind das Wiederherstellen vergessener Passwörter und die Hilfe bei der Konfiguration einzelner Dienstleistungen.

Identitiy Management at the FAU – Background and Current State (Part 3)

Background

In November 2006 the project started to develop a central Identity Management Infrastructure with the aim to provide a basis for the efficient usage of university based IT services (see further  Projektleitdokument from 20.12.2006). The then defined strategic aims are still existing today:

  • Management of increasing administrative demands
  • To avoid duplicated data storage
  • Improvement of user friendliness
  • Relief for employees and administrators
  • Improvement of data quality and validity
  • Improvement of data security

During the course of the project the aspect of system integration was added which can not only be advanced through an IdMS, but be enabled through it in the first place.

On 8. October 2008 first parts “behind the scenes” went into the productive area. Since then multiple enhancements were developed on this base, which in the end make today’s IdMS. The basis concept remains unchanged.

All the following implementations are related to the current state of the system.

Source System

Systems are called source systems which are reading data from the IdMS. The source systems of the IdMS can roughly be separated in the following categories:

  • Personal administration systems
  • Structural administration systems
  • Other systems

At the moment the following personal administration systems are included:

  • Master data systems for students HIS SOS
  • Personal administration system VIVA
  • Indirectly via the near IdM personal administration system for “others” (Yet Another AFFiliation, short yaaff) as a layer for quality management:
    • Information system UnivIS
    • PhD-students administration docDaten
    • Personal administration system FAU Busan
    • Other management RRZE

The only representative of the category structural administration system is the central application to maintain the organizational structure FAU.ORG.

Representatives of the category “other systems” are for example systems which have data sovereignty for at least one attribute. For example official mail addresses are not created or defined in the IdMS but are questioned from the system for the reservation of mail addresses.

Core

The core of the IdMS consists of a multitude of single modules. Whereas a part of the modules takes the correct compilation of personal entries from different source systems, another part computes deducible services. They all have the underlying meta directory in common, thus the in IdMS saved data.

Changes in the source systems should be quickly prepared and synchronized with all the affected systems. These include actions of the users in web applications; especially the setting of a new password. The consequences range from simple value changes in one attribute to the complete new generation or deletion of an account.

Target systems

Systems are called target systems in which the IdMS writes its data. At the moment the following target systems are included:

Front end

Systems are called front end in the frame of a web application which provides access to certain data and function of the IdMS.

IdM-Portal

At the moment the IdM-Portal is structured in the areas “Self Service” and “Requests/Tasks”.

The Self Service offers the persons who are managed in the IdMS to see the saved personal data in order of data privacy self information. Furthermore the user can see the status of the available services and can perform actions for account and service management.

The area requests/tasks offers, among others, to easily manage even long-term processes with multiple participants.

Administration

The administration function in the IdMS offers the RRZE and FAU employees with tasks within the IdM environment an extended access to the data which are needed for the implementation.

It includes e.g. the employees of the service counters who can therefore help users with problems according to their IdM account or individual services on demand. The most frequent cases are the restoration of forgotten passwords and the help with the configuration of individual services.


Grails Plugins – lokal und global / Grails Plugins – local and global

English Version

Bei der Verwaltung von Grails Plugins in einem zentralen Repository gestaltet sich die lokale Weiterentwicklung der Plugins ggf. schwierig.

Mit dem folgenden Code-Block in der BuildConfig.groovy kann mittels des Kommandozeilenparameters -Dlive=... eines, oder mit
Komma getrennt, mehrere Plugins lokal geladen werden.

Wichtig ist dabei, dass neben dem Hauptprojekt auch alle Plugins mit diesem Code Block ausgestattet werden. So werden auch transitive Abhängigkeiten wie gewünscht mittels relativem Pfad oder aus dem Repository aufgelöst.

[groovy]
/*
* PPSA PLUGIN CONFIGURATION
*/
def runtimePlugins = [
“:ppsa-menu:latest.release”,
“:ppsa-layout:latest.release”,
]

/* —– BEGIN: no changes past here —– */
def live = System.getProperty(“live”)?System.getProperty(“live”).split(‘,’):[]
def filteredLivePlugins = []
if (live) {
filteredLivePlugins = live.inject([]) { list, lib ->
runtimePlugins.grep { it.contains(lib) } ? list << lib : list
}
if (filteredLivePlugins) {
println “[YOUR_PROJECT_NAME_HERE] Loading some plugins from relative paths in the workspace: ” + filteredLive
filteredLivePlugins.each { pluginName -> grails.plugin.location.”${pluginName}” = “../${pluginName}” }
}
}
/* —– END: no changes past here —– */

grails.project.dependency.resolution = {
plugins {
def filteredRuntimePlugins = runtimePlugins.inject([]) { list, lib ->
filteredLivePlugins.grep { lib.contains(it) } ? list : list << lib
}
if (filteredRuntimePlugins) {
println “[YOUR_PROJECT_NAME_HERE] Loading plugins from release repository: ” + filteredRuntimePlugins
filteredRuntimePlugins.each { pluginDef -> runtime “${pluginDef}” }
}
}
}
[/groovy]

Beispiel, wie man zur live Umgebung für das Plugin ppsa-layout wechseln kann:
[bash]
grails clean -Dlive=ppsa-layout
grails run-app -Dlive=ppsa-layout
[/bash]

Grails Plugins – local and global


With the management of Grails Plugins in a central repository the local further development of plugins could become quite difficult.

With the following Code Block in the  BuildConfig.groovy one or more plugins — sepearted via commas — can be loaded locally instead of from the repository with the help of the command line parameter  -Dlive=....

In order to also resolve transitive dependencies in this way it is important that beside the main project all plugins are also provided with this code block. This way also transitive dependencies can be loaded from a relative path or from the repository.

[groovy]
/*
* PPSA PLUGIN CONFIGURATION
*/
def runtimePlugins = [
“:ppsa-menu:latest.release”,
“:ppsa-layout:latest.release”,
]

/* —– BEGIN: no changes past here —– */
def live = System.getProperty(“live”)?System.getProperty(“live”).split(‘,’):[]
def filteredLivePlugins = []
if (live) {
filteredLivePlugins = live.inject([]) { list, lib ->
runtimePlugins.grep { it.contains(lib) } ? list << lib : list
}
if (filteredLivePlugins) {
println “[YOUR_PROJECT_NAME_HERE] Loading some plugins from relative paths in the workspace: ” + filteredLive
filteredLivePlugins.each { pluginName -> grails.plugin.location.”${pluginName}” = “../${pluginName}” }
}
}
/* —– END: no changes past here —– */

grails.project.dependency.resolution = {
plugins {
def filteredRuntimePlugins = runtimePlugins.inject([]) { list, lib ->
filteredLivePlugins.grep { lib.contains(it) } ? list : list << lib
}
if (filteredRuntimePlugins) {
println “[YOUR_PROJECT_NAME_HERE] Loading plugins from release repository: ” + filteredRuntimePlugins
filteredRuntimePlugins.each { pluginDef -> runtime “${pluginDef}” }
}
}
}
[/groovy]

Example on how to switch to the live environment for the plugin ppsa-layout:
[bash]
grails clean -Dlive=ppsa-layout
grails run-app -Dlive=ppsa-layout
[/bash]

Grails Plugins in eigenem Maven Repository verwalten / Manage Grails Plugins in own Maven Repository

English Version

In diesem Beitrag zeige ich kurz wie man Grails 2 Plugins als Releases in einem eigenen Maven Repository wie Archiva oder Artifactory verwalten kann. Dafür sind grundsätzlich zwei seperate Konfigurationen für Upload und Download vom Repository nötig.

Upload

Für das Releasen neuer Versionen in das eigene Repository bietet Grails 2 das Release Plugin, das man allerdings erst selbst nachinstallieren muss:
[bash]
grails install-plugin release
[/bash]

Die nötige Konfiguration dazu wird in die ~/.grails/settings.groovy ausgelagert. Einträge in dieser Datei gelten für alle Grails Projekte und sind äquivalent zu Einträgen in der BuildConfig.groovy.

Hier ein Beispiel zur Einrichtung von Archiva als Release Repository:
[groovy]
/*
* THIS IS FOR UPLOADING TO THE REPO (via release plugin)
* To use this do:
* grails2 install-plugin release
*/
grails.project.repos.default = “rrzeArchiva”

grails.project.repos.rrzeArchiva.url = “http://REPOSITORY:PORT/archiva/repository/internal/”
grails.project.repos.rrzeArchiva.username = “USERNAME”
grails.project.repos.rrzeArchiva.password = “PASSWORD”

// disable nagging about not having committed all changes…
grails.release.scm.enabled = false
[/groovy]

Das Beispiel Konfiguriert das rrzeArcchiva Repository als Default für Uploads und deaktiviert die SVN Überprüfung für nicht eingecheckte Änderungen.

Fertig.

Neue Releases können dann mit folgenden Build Targets ins Repository geladen bzw. in den lokalen Maven Cache installiert werden.
[bash]
grails maven-deploy
grails maven-install
[/bash]

Download

Für den automatischen Download von Plugins aus dem Repository sind folgende Einträge in der BuildConfig.groovy des Projektes nötig.
[groovy]
grails.project.dependency.resolution = {
repositories {
mavenLocal()
mavenRepo name:”rrzeArchiva”, root:”http://REPOSITORY:PORT/archiva/repository/internal”
}
plugins {
runtime “:ppsa-menu:latest.release”
}
}
[/groovy]

Der Repositories Abschnitt Konfiguriert den lokalen Maven Cache und das Archiva Repository als zu durchsuchende Quellen für Plugin Abhängigkeiten.
Die Plugin Abhängigkeiten selbst werden im eigenen Abschnitt Plugins verwaltet. Der Beispieleintrag lädt immer die aktuellste Version des Plugins ppsa-menu.

Eigentlich würde das nun schon reichen, um Plugins auf dem Repository zu installieren.

Die allermeisten internen Repositories werden jedoch noch zusätzlich eine Authentifizierung erfordern. Hierfür muss noch der folgende Eintrag zur ~/.grails/settings.groovy hinzugefügt werden.
[groovy]
/*
* THIS IS FOR DOWNLOADING FROM THE REPO
* To use this add this to your BuildConfig.groovy:
* mavenRepo name:”rrzeArchiva”, root:”http://REPOSITORY:PORT/archiva/repository/internal”
*/
grails.project.ivy.authentication = {
credentials {
realm = “Repository Archiva Managed internal Repository”
host = “REPOSITORY(ohne Port!)”
username = “USERNAME”
password = “PASSWORD”
}
}
[/groovy]

—- WICHTIG —-

Für Archiva muss der Realm wie angegeben konfiguriert werden. Sonst geht nix!

Außerdem muss der Host hier ohne Port angegeben werden. Wenn das Archiva also z.B. auf Port 8080 läuft ist diese Angabe hier wegzulassen.
—- WICHTIG —-

Managing Grails Plugins in own Maven Repository


In this post I will briefly show how to manage Grails 2 Plugins as releases in an own Maven Repository such as Archiva or Artifactory. Therefore basically two separate configurations for Upload and Download from the repository are needed.

Upload

To release new versions in the own repository Graisl 2 offers the Release Plugin, which though must be installed additionally by yourself:
[bash]
grails install-plugin release
[/bash]

The necessary configuration for this is stored in the  ~/.grails/settings.groovy. Entries in this data are valid for all Grails projects and equivalent entries in the BuildConfig.groovy.

Here is an example of installing Archiva as release repository:
[groovy]
/*
* THIS IS FOR UPLOADING TO THE REPO (via release plugin)
* To use this do:
* grails2 install-plugin release
*/
grails.project.repos.default = “rrzeArchiva”

grails.project.repos.rrzeArchiva.url = “http://REPOSITORY:PORT/archiva/repository/internal/”
grails.project.repos.rrzeArchiva.username = “USERNAME”
grails.project.repos.rrzeArchiva.password = “PASSWORD”

// disable nagging about not having committed all changes…
grails.release.scm.enabled = false
[/groovy]

The example configures the rrzeArcchiva repository as Default for Uploads and deactivates the SVN proof for not-checked-in changes.

Done.

New releases can be loaded with the following Build Target in the Repository, respectively installed the local Maven Cache.
[bash]
grails maven-deploy
grails maven-install
[/bash]

Download

For the automatic download of plugins from the repository the following entries in the  BuildConfig.groovy of the project are needed.
[groovy]
grails.project.dependency.resolution = {
repositories {
mavenLocal()
mavenRepo name:”rrzeArchiva”, root:”http://REPOSITORY:PORT/archiva/repository/internal”
}
plugins {
runtime “:ppsa-menu:latest.release”
}
}
[/groovy]

The repository paragraph configures the local Maven Cache and the Archiva Repository as sources for plugin dependencies which have to be browsed.
The plugin dependencies themselves are managed in the own paragraph plugins. The example entry is always loading the most current version of the plugin ppsa-menu.

Actually this would be enough to install plugins on the repository.

Most of all intern repositories will though need further authentication. Therefore the following entry has to be added ~/.grails/settings.groovy.
[groovy]
/*
* THIS IS FOR DOWNLOADING FROM THE REPO
* To use this add this to your BuildConfig.groovy:
* mavenRepo name:”rrzeArchiva”, root:”http://REPOSITORY:PORT/archiva/repository/internal”
*/
grails.project.ivy.authentication = {
credentials {
realm = “Repository Archiva Managed internal Repository”
host = “REPOSITORY(ohne Port!)”
username = “USERNAME”
password = “PASSWORD”
}
}
[/groovy]

—- IMPORTANT —-

For Archiva the realm must be configured as shown. Or nothing will work!

Also, the Host must be stated here without Port. If the Archiva is also running e.g. on Port 8080 these information can be omitted here.
—- IMPORTANT —-

Identity Management an der FAU – Studierendenverwaltung (Teil 2)

This gallery contains 7 images.

Quellsysteme Wenn im Identity Management (IdM) Bereich von Quellsystemen die Rede ist, denkt man häufig sofort an Personenverwaltungen. Die Bereitstellung von Informationen zu Personen ist sicherlich die bedeutendste und außenwirksamste Variante. Quellsysteme eines IdMS können jedoch ganz unterschiedlicher Natur sein. U.a. gehören auch die Lieferung von Daten zur Organisationsstruktur, Mailadressen oder Funktionen in die Kategorie […]

Identity Management an der FAU – Übersicht (Teil 1)

English Version
Dieser und die darauf folgenden Beiträge sollen einen Einblick in die Konzepte und Techniken des Identity Mangement Systems der FAU geben. Um die Serie etwas interessanter zu gestalten, werden die einzelnen Beiträge nicht streng logisch erscheinen. Die ersten zehn Beiträge behandeln also nicht das Konzept des Kerns. Vielmehr wird direkt im Anschluss an dieser zugegebenermaßen recht kurzen Übersicht die erste Anbindung eines Quellsystems beschrieben. Danach folgt ein Beitrag über die Anbindung eines Zielsystems, gefolgt von den grundlegenden Konzepten des Kerns, ein weiteres Quellsystem, …

Trotz dieser Sprünge wird versucht ohne große Wiederholungen und Vorwärtsverweise auszukommen. Mit etwas “Hintergrundwissen” sollten alle Beiträge eigenständig lesbar sein. Rückmeldungen sind natürlich willkommen!

Und jetzt viel Spaß beim Lesen.

Übersicht

Lebenszyklus

IdM Lebenszyklus

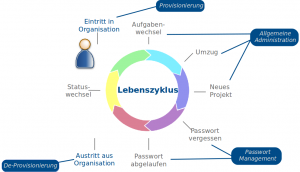
Eine der Hauptgründe für die Einführung eines Identity Management Systems (IdMS) ist die zentrale Provisionierung und Deprovisionierung von Konten unterschiedlicher Dienste für Personen einer Organisation. Tritt eine neue Person in die Organisation ein, sollen möglichst sofort alle benötigten Ressourcen, welche zur Erledigung der zugedachten Aufgaben nötig sind, bereitstehen. Ändert sich das Aufgabengebiet einer Person, soll die Bereitstellung der Ressourcen angepasst werden. Verlässt eine Person schließlich die Organisation, sollen alle zugeteilten Ressourcen möglichst sofort entzogen werden.

Neben diesen grundlegenden Änderungen, besteht jedoch auch der Wunsch nach einer dauerhaften Aktualisierung von provisionierten Attributen. Das wohl bekannteste Beispiel eines solchen Attributs ist das Passwort. Aber auch Änderungen persönlicher Daten, wie z.B. Titel oder Kontaktadresse, sollen zeitnah in alle angeschlossenen Systeme, welche das entsprechende Attribut verwenden, aktualisiert werden.

Um diese Aufgaben erfüllen zu können, sind jedoch einige Vorarbeiten nötig. Die
genannten Vorgänge

  • neue Person tritt in die Organisation ein
  • Aufgabengebiet einer Person ändert sich
  • Attribute einer Person ändern sich
  • Person verlässt die Organisation

müssen erkannt und entsprechend verarbeitet werden. Besitzt die Organisation nur ein System zur Verwaltung von Angehörigen, kann diese Erkennung durch eine lesende Anbindung erledigt werden.

IdM Übersicht

IdM Übersicht

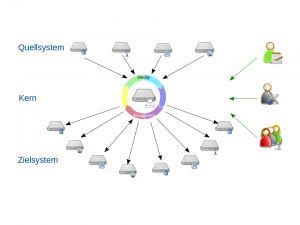
Kommen zwei oder mehrere Systeme zum Einsatz, kommt eine weitere Aufgabe für das IdMS dazu: die Zusammenführung von Einträgen aus verschiedenen Systemen, welche zur gleichen realen Person gehören. Im vorhandenen Fall einer Universität, können als ein Beispiel die Verwaltungssysteme von Mitarbeitern und Studierenden herangezogen werden. Studierende können während ihres Studiums als wissenschaftliche Hilfskräfte tätig sein oder nach dem Abschluss, teilweise mit einer zeitlichen Lücke, als Mitarbeiter anfangen.

Dennoch beginnt alles mit dem Auslesen dieser Systeme, den sogenannten Quellsystemen. Die Konsolidierung der ausgelesenen Daten und darauf aufbauend die Berechnung von zuzuweisenden Dienstleistungen ist der nächste Schritt. Die so ermittelten Dienstleistungen müssen schließlich noch als Konten in die entsprechenden Systeme, den sogenannten Zielsystemen, provisioniert werden. Die Abbildung stellt die einzelnen Schritten schematisch dar.


Identity Management at the FAU – Overview (Part 1)

This and the following post should give an insight to the concept and techniques of the identity management system of the FAU .

To make this series more interesting, the indivudual posts will not appear strictly logical. The first ten posts will therefore not cover the core of the concept. Rather there will be following directly to this, admittedly quite short overview the first connection of a source system displayed. Afterwards a post about the connection of a target system will continue the series, followed by essential concept of the core, another source system, …

Despite of these jumps there should be no repetitions or any forward references. With a little “background knowledge” it should be possible to read the posts individually. Feedback is of course welcomed!

And now: have fun reading.

Overview

Lebenszyklus
IdM Life Cycle

One of the main reasons for the introduction of an identity management system (IdMS) is the central provisioning and deprovisioning of accounts of different services for persons of an organisation. If a person joins the organisation, then there should be preferably every resources, which are needed for the intended task, directly available. If the field of action changes for a person, the provision of resources has to be adjusted. If a Person leaves the organisation, every assigned resource has to be taken back immediately.

Beside these fundamental changes, there is also the wish for a lasting update of provisioned attributes. The best known example of such an attribute is the password. But also changes of personal data, such as title or contact address, should be updated immediately in every connected system.

To complete these tasks however some preliminary work is needed. The said actions

  • new person enters the organisation
  • field of action of a person changes
  • attribute of a person changes
  • person leaves organisation

need to be identified and be used accordingly. If the organisation only has a system for the administration of members, this cognition can be completed with a reading connection.

IdM Übersicht
IdM Overview

If there are two or more systems used, there will be another task for IdMS: the connection of entries from different systems which belong zu the same real person. In the existing case of a university, the adminstration systems of employees and students can be used as an example. Students can be working as student assistants during their studies or after that, sometimes with a short time gap, start to work as an employee.

However, everything starts with the reading of these systems, the so called source system. The consolidation of the read data and on this data build calculations of referable services is the next step. Eventually the so determined services have to be provisioned into an according system. The illustration shows schematically the individual steps.

Postgres, Serials und Rules: Achtung!

Achtung bei folgender Konstellation:
[sql]
CREATE TABLE source
(
id serial NOT NULL,
“text” character varying(255),
CONSTRAINT id_pkeyPRIMARY KEY (id)
)
[/sql]

mit Regel:
[sql]
CREATE RULE “insert_rule” AS
ON INSERT TO source DO  INSERT INTO dest (sourceid)
VALUES (NEW.id);
[/sql]

Serial und Bigserial sind in Postgres intern so konzipiert, dass der Wert für das Feld durch einen Aufruf von
[sql]
nextval(‘source_id_seq’)
[/sql]
erzeugt wird. Entgegen der Erwartung wird nach Ausführen der Regel aber nicht source.id in die Tabelle dest eingetragen, sondern source.id +1. Bug oder einfach so gewolltes Verhalten von Postgres? In der Postgres-Dokumentation zu Regeln findet sich zumindest ein entsprechender Kommentar:
“Beware that CREATE RULE insert_foo AS ON INSERT TO foos DO ALSO INSERT INTO bar (foo_id) VALUES (NEW.id); won’t work if foo.id is a serial (and foo_id REFERENCES foos ofcourse) because nextval() is evaluated twice.”

Sauberste Lösung: Hier keine Regel, sondern einen Trigger verwenden.

Postgres, Serials and Rules: Caution!

Caution with the following constellations:
[sql]
CREATE TABLE source
(
id serial NOT NULL,
“text” character varying(255),
CONSTRAINT id_pkeyPRIMARY KEY (id)
)
[/sql]

with rule:
[sql]
CREATE RULE “insert_rule” AS
ON INSERT TO source DO  INSERT INTO dest (sourceid)
VALUES (NEW.id);
[/sql]

Serial and Bigserial are so in Postgres internally designed that the data for the field can be generated with the request of
[sql]
nextval(‘source_id_seq’)
[/sql]
Against all expectations after carrying out the rule it is not source.id which is filled into the table dest but source.id +1. Bug or simply unwanted behavior of Postgres? In the Postgres-Documentation the rules can be found at least in on depending commentary:
“Beware that CREATE RULE insert_foo AS ON INSERT TO foos DO ALSO INSERT INTO bar (foo_id) VALUES (NEW.id); won’t work if foo.id is a serial (and foo_id REFERENCES foos ofcourse) because nextval() is evaluated twice.”

Cleanest solution: Do not use a rule here but a trigger.

Wir sind umgezogen! – We moved!

English Version

Wochenlang Funkstille und dann solche News?
Nein, wir haben uns nicht vom RRZE abgespalten, noch wurden wir rausgeworfen. 😉

Vielmehr sind auch wir von der Fassadenrenovierung betroffen. Um dem akuten Raummangel abzuhelfen, hat die FAU daher einige Container gekauft und im Süd-Gelände unweit des RRZE aufgestellt.

Zur Orientierung finden Sie eine Google Map unter http://g.co/maps/tdsu4

Wer uns mit Hilfe eines Navigationssystems finden will, steuere die “Haberstr. 5, 91058 Erlangen” an.
Unsere offizielle Adresse lautet aber weiterhin auf “Martensstr. 1, 91058 Erlangen”.

Und bezüglich der Funkstille gelobe ich spätestens als Neujahrs-Vorsatz auch Besserung. 😎

We moved!

Weeks have gone without any sign of life and now news like this?
No, we did not split from the  RRZE and no, we haven’t been kicked out. 😉

In fact we are also affected from the  facade renovation. To do something against the acute lack of space, the FAU bought a few containers which have been placed in the southern space, not far from the RRZE.

For orientation you can find a Google Map under  http://g.co/maps/tdsu4

If there is somebody who wants to find us with the help of a navigation system should head for “Haberstr. 5, 91058 Erlangen”.
Our official address remains “Martensstr. 1, 91058 Erlangen”.

And because of the silence: I promise improvement at least as a new year’s resolution . 😎

DocDaten 2.0.2 online

Heute wurde die Version 2.0.2 der Promovierendenverwaltung online gestellt. Die Verbesserungen sind vor allem für die Mitarbeiter der Promotionsbüros relevant. So können E-Mails, mit denen Dokumente von den Promovierenden angefordert werden, nun individuell ergänzt werden.
Sichtbar für alle Nutzer der Registrierung ist die neu gestaltete kontextbezogene Hilfe.

DocDaten 2.0.2 online

Today the version 2.0.2 of the PhD-student management went online. The improvements are especially relevant for the PhD offices. E-mails, with which documents can be requested from the PhD-students can now be individually adjusted.

Visible for every user of the registration is the new designed context based help.